
When it comes to hatching duck eggs, it can be difficult to tell which eggs are fertile and which are not. This is where candling comes in.
Candling is a process in which a bright light is used to illuminate the inside of an egg to determine if it is fertile and developing properly.
To candle duck eggs, you will need a bright light source such as a flashlight or a candler. Hold the egg up to the light and examine its contents.
In this article, we will guide you through the process of how to candle duck eggs? step-by-step, so you can increase your chances of hatching healthy ducklings.
A fertile egg will show a network of veins, an air cell at the blunt end, and possibly a moving embryo. If the egg is not fertile, it will appear clear or have an irregular yolk shape.
How To Candle Duck Eggs?
Candling duck eggs is a way to check the development of the embryo inside the egg. It is done by shining a bright light through the shell, which allows you to see the inside of the egg.
Here are the steps on how to candle duck eggs:
- Gather your materials. You will need a dark room, a flashlight or candling light, and a marking pen.
- Place the egg in a dark room. The room should be as dark as possible so that you can see the inside of the egg clearly.
- Hold the egg up to the light. Hold the flashlight or candling light close to the egg, but not so close that you touch the shell.
- Look for the air sac. The air sac is a small pocket of air at the bottom of the egg. It will appear as a dark spot on the egg.
- Look for the embryo. The embryo will appear as a small dark spot near the air sac. It will be surrounded by a network of veins.
- Mark the eggs. If you see any eggs that are not developing properly, mark them with the marking pen. You can then remove them from the incubator.
You can candle duck eggs at different stages of incubation to check the development of the embryo. Here are the recommended times to candle duck eggs:
- 7 days: This is the first time you should candle duck eggs. You will be able to see if the eggs are fertile and if the embryos are developing properly.
- 14 days: This is the second time you should candle duck eggs. You will be able to see if the embryos are still developing properly and if they are close to hatching.
- 18 days: This is the third and final time you should candle duck eggs. You will be able to see if the embryos have hatched.
Candling duck eggs is a simple way to check the development of the embryo inside the egg. It is a useful tool for ensuring that your duck eggs are hatching properly.
Here are some additional tips for candling duck eggs:
- Use a strong flashlight or candling light. The light should be bright enough so that you can see the inside of the egg clearly.
- Hold the egg still. If you move the egg around, you may not be able to see the embryo properly.
- Be patient. It may take a few minutes to see the embryo inside the egg.
- If you are not sure if an egg is developing properly, ask a poultry expert for help.
What Is Mean Of Candling A Duck?
Candling is a process of holding an egg against a bright light source to determine the development of the embryo inside the egg. It is an ancient technique that has been used for centuries.
Purposes Of Candling Eggs
Here are some purposes of candling eggs:
- To check for fertility: Candling eggs can help determine if an egg is fertile or not by looking for the development of an embryo.
- To check for freshness: Candling can help identify fresh eggs from stale ones. Fresh eggs will have a clear and distinct air sac, while stale ones will have a larger and less defined air sac.
- To check for cracks or defects: Candling eggs can help identify any cracks or defects in the eggshell. This is particularly important for egg producers to ensure the quality of their product.
- To monitor incubation: Candling eggs during incubation can help monitor the progress of the embryo’s development and ensure that the conditions are optimal for hatching.
- To identify egg-laying problems: Candling can help identify any problems with egg-laying in poultry, such as egg binding or egg peritonitis. This can help farmers address the issue and prevent further complications.
The primary purpose of candling duck eggs is to determine if they are fertile and developing properly. By identifying infertile eggs early on, they can be removed from the incubator to prevent them from spoiling and harming healthy embryos.
Candling also allows for the monitoring of the growth and development of the embryos, which can help predict when they will hatch and ensure they have the best chance for success.
Candling can be used to diagnose any issues or abnormalities with the developing embryos, such as malpositions or deformities.
Candling Be Used To Determine The Age Of Eggs For Culinary Purposes
Candling can also be used to determine the age of duck eggs for culinary purposes. As eggs age, the air cell inside them grows larger, and the yolk and white become thinner.
By candling an egg, you can estimate its age and determine if it’s still fresh enough to eat or not.
Importance Of Candling A Duck

Candling a duck egg is an important step in the process of hatching healthy ducklings. By identifying infertile eggs early on, you can prevent them from spoiling and harming healthy embryos.
Candling also allows for the monitoring of the growth of embryos.
How To Candle Duck Eggs?
Here are major steps for “To Candle Duck Eggs”:
Step 1
1. Gather Your Materials
To begin any project, it’s crucial to gather all the necessary materials beforehand. This not only saves time, but also ensures a smoother workflow and minimizes the risk of errors. When gathering your materials, make a list of everything you’ll need, including tools, supplies, and equipment. Check off each item as you collect it to avoid overlooking anything. By taking the time to gather your materials and prepare your workspace, you’ll set yourself up for success and be one step closer to completing your project.
Step 2
2. Choose The Right Time
Wait at least 7-10 days after the eggs have been laid before candling them. This is when the embryos start developing and can be seen under light.
Step 3
3. Get A Good Light Source
A bright LED flashlight or a candler specifically designed for eggs can be used to illuminate the eggs.
Step 4
4. Find A Dark Room
Candling should be done in a dark room to make it easier to see the contents of the egg.
Step 5
5. Hold The Egg Correctly
Gently hold the egg between your thumb and fingers, making sure not to drop or shake it.
Step 6
6. Shine The Light Through The Egg
Hold the light source against the larger end of the egg and look for any dark spots or shadows. These indicate the presence of an embryo.
Step 7
7. Check For Abnormalities
Look for any abnormalities such as blood rings, which indicate the embryo has died, or cracks in the shell.
Step 8
8. Repeat The Process
Candling should be done several times throughout the incubation period to monitor the development of the embryo and ensure it is healthy.
Step 9
9. Discard The Infertile Eggs
At the end clear or discard all infertile eggs from your approach in process.
By following these simple steps for candling duck eggs, you can increase your chances of successful hatching and enjoy healthy ducklings in no time!
How Do You Safely Candle Eggs?
To safely candle eggs, always make sure to handle them gently and avoid shaking or dropping them. Use a bright but gentle light source to illuminate the eggs, such as an LED flashlight or specialized egg candler.
It’s also important to perform candling in a dark room to ensure that you can clearly see the contents of the egg.
When holding the egg, be sure to position it so that you can easily shine the light through the larger end of the egg and observe any abnormalities or signs of development.
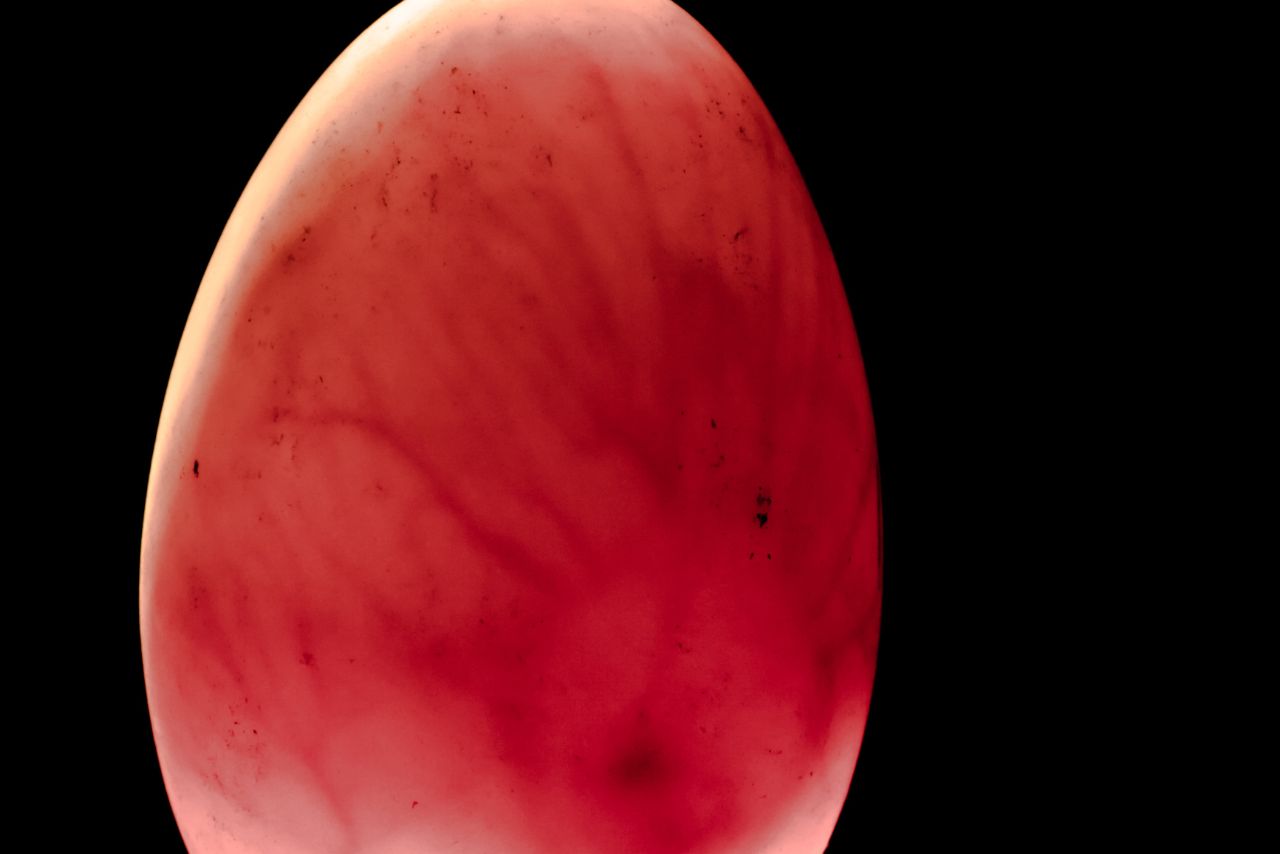
What Should A Duck Egg Look Like When Candled?

When candling a duck egg, it should have a clear and evenly shaped air cell at the top. The yolk should be visible below the air cell, with the rest of the egg appearing mostly opaque.
As the embryo develops, you should start to see distinct blood vessels forming around the yolk. By day 14 to 18 of incubation, the embryo should be filling most of the egg and taking on a more recognizable shape.
It’s important to note that not all eggs will hatch successfully, even if they appear healthy during candling.
Factors such as temperature fluctuations or genetics can affect an embryo’s development.
Can You Candle Duck Eggs On Day 26?
It is not recommended to candle duck eggs on day 26 or later, as this can cause stress to the developing embryos and increase the risk of harming them.
By day 26, the embryos should be fully developed and ready for hatching. It’s best to leave them alone and let nature take its course at this point.
What Do Bad Candled Eggs Look Like?
Bad candled duck eggs may appear different depending on the issue. Infertile eggs will appear clear with no visible development, while dead embryos may show a blood ring or other abnormalities.
Moldy or rotten eggs will have a foul odor and discoloration, and cracked eggs may leak and harbor bacteria.
It’s important to discard any bad eggs promptly to prevent contamination of healthy eggs and reduce the risk of illness from consuming spoiled products.
How Do You Know If A Candle Egg Is Fertile?

To determine if a candle egg is fertile, you can look for the presence of a developing embryo during candling.
This will typically appear as dark spots or shadows within the egg, indicating that the fertilized egg has started to develop into a duckling.
Conclusion!
Candling duck eggs is an important process for ensuring healthy hatching and identifying any potential issues early on.
By following the steps outlined above, you can safely and effectively candle your duck eggs throughout the incubation period.
Remember to handle the eggs gently, use a bright but gentle light source, and perform candling in a dark room for optimal visibility.
Look for clear air cells at the top of the egg, visible yolks, and developing embryos as signs of healthy eggs. Discard any infertile or bad eggs promptly to prevent contamination and reduce the risk of illness.
With practice and patience, you can become skilled at candling duck eggs and enjoy raising your own flock of healthy ducklings!
FAQs
Why Is Candling Duck Eggs Important?
Candling duck eggs is important to ensure healthy hatching and identify any potential issues early on.
What Should a Healthy Duck Egg Look Like when Candled?
A healthy duck egg should have a clear and evenly shaped air cell at the top, visible yolks, and developing embryos.
When Should You Not Candle Duck Eggs?
It is not recommended to candle duck eggs on day 26 or later, as this can harm the developing embryos.
How Do You Know if A Candle Egg Is Fertile?
To determine if a candle egg is fertile, look for dark spots or shadows within the egg during candling.
What Should You Do with Bad Candled Eggs?
Discard any bad candled eggs promptly to prevent contamination and reduce the risk of illness from consuming spoiled products.


